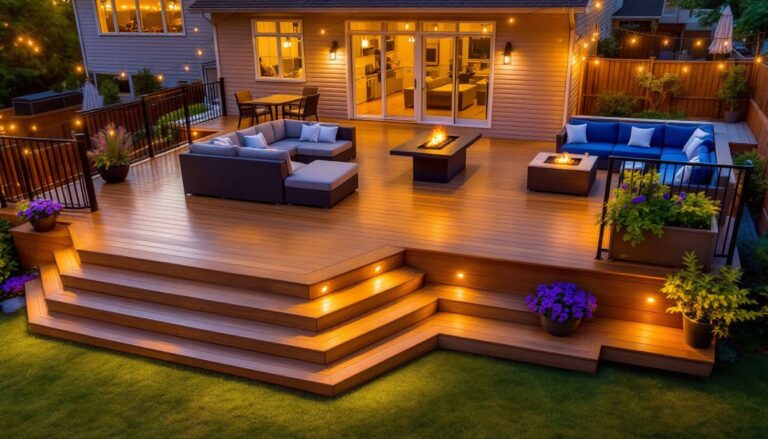

A cramped backyard doesn’t mean sacrificing your outdoor living dreams. Multi level decks solve the tight-space puzzle by stacking zones vertically instead of sprawling horizontally, giving you distinct areas for dining, lounging, and grilling without eating up every square foot of grass. They also work wonders on sloped lots where a single-plane deck would require towering posts or expensive excavation. Whether you’re dealing with a narrow side yard or a hilly corner lot, these 15 small multi level deck ideas show how to squeeze style, function, and code-compliant structure into compact footprints.
Table of Contents
ToggleKey Takeaways
- Small multi level deck ideas maximize limited backyard space by stacking zones vertically for distinct dining, lounging, and grilling areas without sprawling horizontally.
- Two-tier and three-tier deck designs work especially well on sloped lots, reducing support post height and costly excavation while improving drainage and preventing water pooling.
- Cantilever overlaps of 12 to 18 inches and L-shaped configurations turn cramped side yards and corner lots into functional outdoor living spaces under 200 square feet.
- Contrasting deck board orientations, integrated LED lighting, and horizontal cable railings enhance visual appeal and make small spaces feel larger and more sophisticated.
- Built-in bench seating with hinged storage, under-deck drainage systems, and serving counters add functional features that maximize every square inch without sacrificing style.
- Composite decking materials and light color schemes reflect sunlight and prevent the deck from feeling enclosed, while proper permits and safety protocols ensure code compliance.
Why Choose a Multi Level Deck for Small Spaces
Building up instead of out makes sense when ground real estate is precious. A two-tier or three-tier deck divides activities, one level for a dining table, another for lounge chairs, without carving your yard into disconnected patches. The elevation change creates natural boundaries, so a grill station on the upper tier doesn’t crowd the conversation pit below.
Sloped sites benefit even more. Stepping the deck down a hillside follows the grade instead of fighting it, trimming the height of support posts and reducing the volume of fill or retaining walls. You’ll save on lumber and labor compared to building a massive single platform that hovers ten feet above grade.
Multi level decks also dodge drainage headaches. Each tier can pitch slightly toward its own edge, channeling rainwater away from the house and preventing pooling. And because the footprint stays compact, you’ll have lawn or garden space left for landscaping, something a sprawling single-level deck can’t offer.
Space-Saving Multi Level Deck Layouts
Two-Tier Deck Designs for Compact Yards
A classic two level deck idea puts a main platform off the back door, usually 12×16 feet or 10×14 feet, then drops six to eight inches to a secondary zone. That single step defines space without requiring guardrails (IRC threshold is 30 inches above grade), keeping sight lines open and material costs down. Frame the lower tier with 2×8 joists on 16-inch centers, same as the upper, but drop the beam one joist depth.
Another smart move: cantilever the upper deck 12 to 18 inches beyond its beam so the lower level tucks partly underneath. This overlap shades the lower tier and creates a cozy nook for potted plants or a small beverage cooler. Just confirm your cantilever doesn’t exceed code limits, typically one-quarter of the joist span for 2×10 or 2×12 joists.
For very tight yards, a 10×12-foot upper deck paired with an 8×10-foot lower landing keeps the overall footprint under 200 square feet. Use the upper level for a bistro table and two chairs, and reserve the lower for a bench or a pair of Adirondack chairs. The vertical separation makes both zones feel roomier than a single 10×20 slab.
L-Shaped and Corner Multi Level Configurations
L-shaped decks wrap around a corner of the house, turning wasted side-yard space into usable square footage. Build the main leg off the back door at one elevation, then step down eight to twelve inches as the deck turns 90 degrees along the side wall. This layout works especially well on corner lots or homes with walk-out basements, where grade drops away from two facades.
Frame the perpendicular sections independently, set a ledger on each wall, then run joists perpendicular to the house. Where the two levels meet, double up joists or install blocking to support the transition. If the elevation change exceeds 30 inches above grade on the lower tier, you’ll need 36-inch guardrails with balusters spaced no more than four inches apart per IRC.
Corner configurations also let you tuck built-in bench seating along the inside elbow, anchoring it to both deck frames. Use 2×4 or 2×6 cedar for the seat and backrest, and you’ve added seating without surrendering floor space to freestanding furniture. Many builders from Fix This Build That and Ana White publish free bench plans scaled for corner decks.
Design Elements That Maximize Visual Appeal
Contrasting deck board orientations on each tier signals the level change and adds geometric interest. Run boards diagonally at 45 degrees on the upper level, then switch to perpendicular or parallel on the lower. Diagonal installs do waste about 15 percent more material to off-cuts, but the payoff is a high-end look that photographs well.
Integrated lighting extends usability after dark and highlights the tier edges for safety. Recess LED step lights into riser faces or mount low-voltage post caps on corner newels. A single 12-volt transformer can power a dozen fixtures: just bury 14-2 landscape cable in conduit if it crosses under the deck. Warm white (2700–3000 K) bulbs feel more inviting than cool daylight tones.
Planters and privacy screens anchor the design vertically without permanent walls. Build a planter box from 5/4×6 deck boards and line it with landscaping fabric, fill with ornamental grasses or trailing vines to soften hard edges. For privacy, mount a trellis or slatted screen to the upper-level railing posts, spacing slats two to three inches apart for airflow. Stain or paint the screen a shade darker than the decking to create depth.
Railing style matters on compact decks. Horizontal cable rails or tempered-glass panels preserve sight lines better than traditional baluster railings, making small spaces feel less boxed in. Cable kits require tensioning every few feet and cost more upfront, but they’re low-maintenance and meet code when spaced to prevent a four-inch sphere from passing through.
Material and Color Choices for Small Multi Level Decks
Pressure-treated pine remains the budget king for framing, about $8 to $12 per eight-foot 2×8 in most regions, but save it for joists and beams hidden from view. For decking and railings, consider composite boards like Trex or TimberTech, which resist rot, don’t need annual sealing, and come in narrow profiles (5.5-inch width) that make small decks look longer. Expect $4 to $8 per linear foot installed.
Cedar and redwood split the difference: natural grain, decent rot resistance, and easier to work than composites (you can screw close to edges without pre-drilling). Both cost $3 to $5 per linear foot for 5/4×6 boards and require sealing every two years to maintain color. If left untreated, they’ll silver to a weathered gray, some homeowners prefer that low-maintenance patina.
Color psychology plays a role in tight quarters. Light grays and taupes reflect more sunlight, preventing decks from absorbing heat and making the space feel airier. Dark browns and charcoals create dramatic contrast but can make a small footprint feel enclosed, especially if surrounded by tall fences. Two-tone schemes, light decking with dark railings, add dimension without busy patterns.
Match your fascia boards to the decking, not the framing lumber. Wrapping exposed joist ends with 1×8 PVC trim or composite fascia in the same color as your deck boards creates a finished edge and hides the framing’s pressure-treated green tint. Fasten with stainless-steel trim-head screws to avoid rust streaks.
Functional Features to Incorporate
Built-in bench seating doubles as a railing on code-compliant decks. Frame a 16-inch-deep bench along one edge of the upper tier, topping it with hinged lids for hidden storage, stash cushions, grill tools, or pool toys inside. Use pressure-treated 2×4s for the frame and cedar 2×6s for the seat slats, spacing them a quarter-inch apart for drainage. If the bench backs up to a 36-inch guardrail, you’ve saved the cost of balusters along that run.
Stairs between tiers deserve extra thought. A single wide step (14 to 16 inches deep) feels more like a transition than a staircase and doesn’t trigger the need for handrails in most jurisdictions. For drops greater than two risers, build code-compliant stairs with 7.75-inch risers and 10-inch treads, this ratio is comfortable and meets IRC. A three-step stringer connecting upper and lower decks can angle across a corner instead of running straight, carving out more usable floor space on both levels.
Incorporate a small bar or serving counter on the upper tier by extending the decking 12 inches past the edge and supporting it with decorative 4×4 posts or metal brackets. Top the cantilevered section with a contrasting material, composite trim board or a sealed butcher block, and you’ve created a pass-through for plates and drinks without dedicating square footage to a separate table.
Don’t skip the under-deck area if your lower tier sits above grade. Lattice skirting hides the framing and deters critters, but corrugated vinyl lattice lasts longer than wood and won’t rot at ground contact. For taller decks (four feet or more), consider an under-deck drainage system, corrugated panels slope between joists to channel water to a gutter, turning the space below into dry storage. These systems add $8 to $12 per square foot but deliver bonus utility on small backyard layouts.
Safety reminder: Always wear safety glasses when cutting treated lumber (the chemicals can irritate eyes), use a dust mask when sawing composites (the plastic dust is fine and airborne), and wear work gloves when handling pressure-treated wood to avoid splinters laced with preservatives. Keep a cordless drill, a circular saw (or miter saw for cleaner angle cuts), a post-hole digger, a 4-foot level, and a speed square in your kit. Most multi level decks require a building permit, check with your local jurisdiction before ordering materials, and plan for footing inspections before pouring concrete.