Shiplap has evolved from barn siding to one of the most popular fireplace surround treatments in modern home design. Its horizontal lines draw the eye, add texture without overwhelming a space, and work equally well in farmhouse, coastal, and contemporary interiors. Unlike tile or stone, shiplap installs over most existing surfaces with basic carpentry skills and doesn’t require mortar or grout. Whether planning a weekend DIY project or gathering inspiration for a contractor-led remodel, these 15 fireplace designs demonstrate how versatile this material can be, from crisp white accent walls to reclaimed wood installations that anchor an entire room.
Table of Contents
ToggleKey Takeaways
- Shiplap fireplace ideas offer versatile design options that work across farmhouse, coastal, and contemporary styles while installing directly over existing surfaces without mortar or demolition.
- Shiplap is a cost-effective and forgiving material for DIYers—standard pine boards are affordable, small gaps hide naturally in shadow lines, and individual damaged boards can be replaced without affecting adjacent sections.
- Building codes require combustible materials like shiplap to maintain specific clearances (typically 6 inches) from fireplace openings, so always verify local requirements and manufacturer specifications before installation.
- White shiplap creates bright, spacious-feeling accent walls that reflect firelight beautifully, while rustic wood-tone and stained options bring warmth and farmhouse character to fireplace surrounds.
- Floor-to-ceiling shiplap installations transform a fireplace wall into a dramatic architectural focal point, and planning the layout beforehand prevents awkward partial boards and ensures professional results.
- Success in DIY shiplap fireplace installation depends on proper surface prep, using construction adhesive with brad nails, checking level every few rows, and painting or staining boards before installation to avoid brush marks in the gaps.
Why Shiplap Is the Perfect Choice for Fireplace Surrounds
Shiplap brings several practical advantages to fireplace installations beyond its visual appeal. The boards install directly over drywall, brick, or even dated tile using construction adhesive and finish nails, eliminating demolition work in most cases. Standard 1×6 or 1×8 pine boards (actual dimensions 3/4″ x 5-1/2″ or 3/4″ x 7-1/4″) are readily available at home centers and cost significantly less per square foot than stone veneer or custom tile.
From a code perspective, shiplap qualifies as combustible material. The International Residential Code (IRC) requires combustible materials to maintain specific clearances from fireplace openings, typically 6 inches from the firebox opening for zero-clearance units and more for masonry fireplaces. Always verify local requirements and your fireplace manufacturer’s specifications before installation. Many homeowners solve this by framing the shiplap around a non-combustible hearth surround or installing the boards beyond the required clearance zone.
The material’s forgiving nature makes it ideal for DIYers. Small gaps between boards hide naturally in the shadow lines, and minor measurement errors rarely show once the wall is painted. Repairs are straightforward, damaged boards pop out and replace individually without disturbing adjacent sections. This practicality explains why shiplap appears in everything from starter homes to high-end renovations.
Classic White Shiplap Fireplace Designs
White shiplap delivers a clean, light-reflecting backdrop that makes living spaces feel larger and more open. Semi-gloss or satin paint finishes hold up better than flat paint around fireplaces, where soot and hand oils accumulate over time. A single accent wall behind the fireplace creates visual interest without committing every surface to the treatment.
Installing white shiplap in a floor-to-ceiling application behind a modern linear gas fireplace creates strong vertical lines that heighten the room. Pairing the white boards with a natural wood mantel adds warmth and prevents the space from feeling sterile. For traditional fireplace openings, running shiplap to the ceiling and flanking it with built-in shelving in matching white paint creates a cohesive focal point that displays books, plants, or family photos.
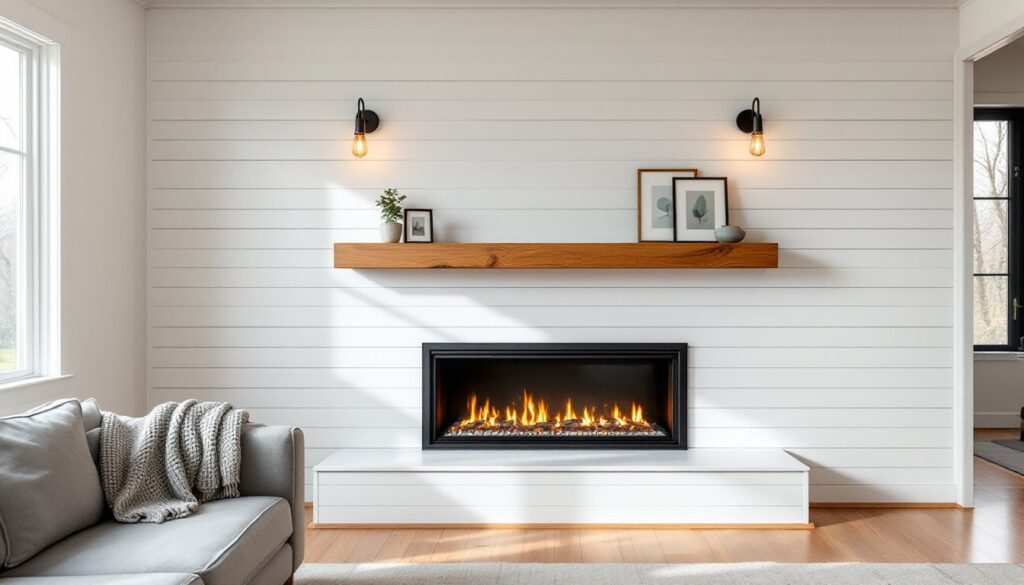
Another approach layers white shiplap only on the chimney breast, the protruding wall section housing the flue, while leaving adjacent walls in a contrasting color. This technique defines the fireplace zone without overwhelming smaller rooms. The white reflects firelight beautifully in the evenings and pairs well with brass or black fireplace screens and tool sets. Homes embracing coastal or cottage aesthetics often use slightly weathered or distressed white shiplap to soften the look.
Rustic Wood-Tone Shiplap Fireplace Inspirations
Leaving shiplap in its natural wood state or applying a stain creates the warm, textured look central to farmhouse and cabin interiors. Reclaimed barn wood brings authentic age and character, though it requires careful inspection for nails, rot, and insect damage before installation. New boards achieve a similar effect with gray or weathered wood stains applied over pine or poplar.
Farmhouse shiplap fireplace ideas often incorporate wide plank boards, 1×10 or 1×12 nominal sizes, for a more substantial, rustic appearance. The wider boards reduce the number of horizontal lines and create a calmer visual rhythm than narrower options. Cedar shiplap offers natural insect resistance and a pleasant aroma, though it costs more than standard pine. For authentic farmhouse appeal, some installers deliberately leave slight gaps between boards or use salvaged materials with nail holes and saw marks intact.
Staining shiplap requires attention to wood selection. Pine absorbs stain unevenly, creating blotchy results unless pre-treated with wood conditioner. Poplar accepts stain more uniformly but lacks the prominent grain pattern many seek in rustic designs. Consider using pre-finished shiplap panels to avoid the blotching issue entirely, these come factory-stained in various tones from honey oak to dark walnut. Sealing the finished surface with polyurethane protects against moisture and soot, especially important in high-use family rooms.
Modern Shiplap Fireplace Ideas with Bold Accents
Contemporary spaces use shiplap as a textural element rather than a rustic statement. Painting boards in deep charcoal, navy, or black creates dramatic accent walls that ground minimalist furniture arrangements. The horizontal lines add dimension without introducing pattern or color complexity that might clash with artwork or statement lighting.
Vertical shiplap installation breaks from tradition and emphasizes ceiling height in modern interiors. This technique works particularly well around tall, narrow fireplace designs or in rooms with vaulted ceilings. The vertical boards lead the eye upward and create a striking backdrop for wall-mounted TVs or large-scale art pieces hung above the mantel.
Mixing materials elevates the design further. Installing shiplap on the upper two-thirds of a fireplace wall with a different material below, smooth plaster, tile, or painted drywall, creates visual interest at eye level. Another approach uses shiplap as framing around a central panel of stone, metal, or tile that directly surrounds the firebox, satisfying code clearances while maintaining the board-and-batten aesthetic elsewhere. Pairing shiplap with industrial elements like steel mantels, concrete hearths, or Edison bulb sconces bridges rustic texture with contemporary edge.
Floor-to-Ceiling Shiplap Statement Walls
Extending shiplap from floor to ceiling transforms a fireplace wall into the room’s primary architectural feature. This treatment works best on walls without windows, where the uninterrupted board lines create maximum impact. Planning the layout before installation prevents awkward partial boards at the ceiling, measure the wall height and adjust board spacing slightly to end with a full-width piece at top and bottom.
For two-story spaces or rooms with vaulted ceilings, floor-to-ceiling shiplap draws attention upward and makes the fireplace feel grand rather than squat. Scaffolding or a sturdy ladder becomes necessary for safe installation above eight feet. Having a second person to hold boards in place while fastening speeds the work considerably and reduces the chance of boards slipping out of alignment during nailing.
Incorporating built-in elements into floor-to-ceiling shiplap walls adds functionality. Recessed alcoves on either side of the chimney breast, framed out before shiplap installation, create display space for books or decorative objects. Running shiplap behind open shelving made from natural edge wood slabs or metal brackets maintains the texture while adding practical storage. The key is planning these elements during the framing stage, retrofitting after shiplap installation means cutting and patching boards, which rarely looks as clean as purpose-built openings.
DIY Shiplap Fireplace Installation Tips and Tricks
Starting with proper surface preparation prevents problems down the line. Remove outlet covers, light fixtures, and any trim around the fireplace. Fill large holes or damaged drywall with joint compound and sand smooth. For installations over brick or stone, apply a layer of 1/2″ or 5/8″ plywood as a nailing base, secured with masonry screws every 16 inches horizontally and vertically. This creates a flat surface and provides solid backing for nails.
Most DIYers use a combination of construction adhesive and 18-gauge brad nails to secure shiplap. Apply a zigzag bead of adhesive to the back of each board, press into place, then drive nails through the board face or into the tongue if using tongue-and-groove material. Face-nailing allows you to use standard shiplap or even common boards: just fill nail holes with wood filler before painting. A pneumatic brad nailer speeds the work significantly compared to hand-nailing and leaves smaller holes to fill.
For consistent spacing between boards, use a nickel or dime as a spacer, the coin thickness creates the classic shadow line without needing to measure each gap. Start at the bottom and work upward, checking level every three to four rows. Walls are rarely perfectly plumb, so small adjustments keep the boards from drifting out of alignment by the time you reach the ceiling.
Cutting shiplap requires a miter saw for clean crosscuts and a table saw or circular saw for rip cuts. Measure twice before cutting, boards around outlets, light switches, or architectural details like mantels need precise notches to fit cleanly. Paint or stain boards before installation to avoid brush marks in the gaps, then touch up nail holes and seams after everything’s secured. Two coats of paint generally provide even coverage, with about 350-400 square feet per gallon for most latex paints.
Safety considerations include wearing safety glasses and a dust mask when cutting, as wood dust irritates eyes and lungs. If working near an active fireplace, ensure it’s completely cool before beginning installation. Never compromise required clearances from the firebox opening, even if it means adjusting the design, fire safety codes exist for good reason and local inspectors will flag violations during home sales or insurance inspections.
Conclusion
Shiplap fireplace surrounds offer flexibility across design styles while remaining accessible to DIY skill levels. Whether drawn to the bright simplicity of painted white boards, the warmth of stained wood, or bold contemporary treatments, the installation process remains similar across styles. The material’s forgiving nature and cost-effectiveness make it an ideal first major carpentry project for homeowners ready to move beyond painting and basic repairs.