
Installing a TV on the patio used to mean dragging an old flatscreen outside for the big game and hoping rain didn’t roll in. Not anymore. Purpose-built outdoor televisions and smart mounting solutions have turned patios into year-round entertainment zones where homeowners can catch Sunday football, host movie nights, or stream cooking shows while grilling. Whether working with a covered pergola or an open-air deck, the right setup balances weather protection, viewing angles, and integration with existing outdoor living spaces. This guide walks through practical outdoor patio TV ideas, from selecting weather-resistant displays to creative placement strategies that won’t require tearing up the yard.
Table of Contents
ToggleKey Takeaways
- Patio TV ideas should prioritize purpose-built outdoor televisions with IP55+ ratings, 700+ nits brightness, and operating ranges from -40°F to 122°F to withstand weather and sunlight.
- Choose screen size based on viewing distance: 50–55 inches for seating 8–10 feet away, and 65–75 inches for areas with 12–15 feet of distance to ensure comfortable viewing.
- Mount outdoor TVs on walls under covered overhangs using full-motion articulating mounts with stainless steel hardware, or use pressure-treated posts set 36 inches deep in concrete for freestanding installations.
- Budget $1,500–$5,000+ for quality outdoor TVs, or $500–$1,200 for weatherproof enclosures that shield standard indoor models from rain, dust, and UV exposure.
- Complete your patio TV setup with weatherproof outdoor speakers (IP65+ rated), comfortable Sunbrella or HDPE seating arranged 6–8 feet from the screen, and low-voltage LED lighting to avoid glare.
- Always obtain electrical permits and hire a licensed electrician to install GFCI-protected 120V circuits per NEC code before running conduit and mounting brackets.
Why Add a TV to Your Patio?
A patio TV extends living space beyond interior walls, making outdoor areas functional for more than seasonal cookouts. Homeowners use them for NCAA tournament watch parties, backyard movie nights with the kids, or background entertainment during dinner parties. Unlike indoor TVs, outdoor models are designed to handle temperature swings, humidity, and direct sunlight without image washout or hardware failure.
The return on investment comes from increased usage of outdoor spaces. A well-equipped patio becomes the default gathering spot from spring through fall, and in mild climates, year-round. Guests naturally migrate toward screens during events, so placing one outside keeps the party from bottlenecking indoors. For DIYers planning broader backyard entertaining area ideas, a TV anchors the layout and informs decisions about seating, lighting, and electrical runs.
Before running conduit or mounting brackets, check local permitting requirements. Adding a TV often means installing weatherproof outlets (GFCI-protected 120V circuits per NEC Article 210.8), which may require an electrical permit and inspection. If the patio lacks existing power, budget for a licensed electrician to run a dedicated circuit from the main panel.
Choosing the Right Outdoor TV for Your Patio
Not every TV belongs outside. Indoor models lack the weatherproofing and brightness needed for outdoor environments, and warranties typically void with outdoor use. True outdoor TVs feature sealed enclosures, anti-glare screens rated at 700+ nits brightness (versus 300–400 nits for indoor models), and operating temperature ranges from -40°F to 122°F. Brands like SunBrite, Samsung Terrace, and Séura dominate the outdoor TV market, with prices starting around $1,500 for a 43-inch model and climbing to $5,000+ for 75-inch screens with 4K HDR.
For budget-conscious projects, weatherproof TV enclosures provide an alternative. These aluminum or polycarbonate cabinets shield standard indoor TVs from rain, dust, and UV exposure. Enclosures typically add $500–$1,200 to the setup cost but allow use of existing TVs. Ventilation fans and heaters inside the enclosure regulate temperature, though they require a separate power source. The tradeoff: enclosures add bulk and may not achieve the brightness of purpose-built outdoor TVs.
Screen size depends on viewing distance. For patios with seating 8–10 feet from the screen, a 50–55-inch TV works well. For larger entertainment areas with seating 12–15 feet away, step up to a 65–75-inch model. Measure the space before shopping, oversizing creates neck strain, while undersizing makes text and detail hard to read.
Weather-Resistant Features to Consider
IP ratings (Ingress Protection) indicate how well a TV resists dust and moisture. Look for a minimum rating of IP55 (dust-protected, resistant to water jets from any direction). Higher ratings like IP68 offer full dust-tightness and submersion protection, useful for patios near pools or in high-humidity climates.
Operating temperature range matters more than most DIYers expect. Standard TVs shut down below 32°F or above 95°F. Outdoor models use internal heaters and cooling fans to maintain safe operating temps in extreme conditions. For uncovered patios in the Southwest or upper Midwest, this feature is non-negotiable.
Anti-reflective coatings and high-brightness panels combat glare from direct sunlight. Standard TVs become unwatchable in afternoon sun, even under shade. Outdoor models use matte screens and backlights capable of 1,000+ nits, ensuring visibility during daytime games. If mounting under a pergola or covered patio, moderate brightness (500–700 nits) suffices and saves $500–$1,000 on the purchase price.
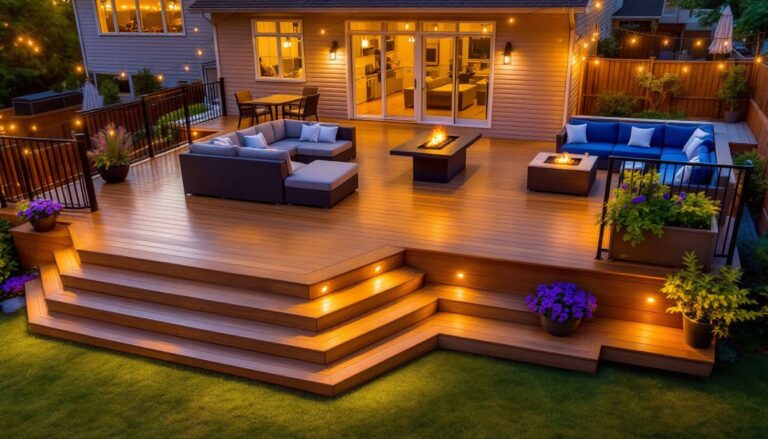
Creative Patio TV Placement and Mounting Ideas
Placement dictates both viewing comfort and weatherproofing strategy. Mount TVs on walls under covered overhangs whenever possible, this provides the best protection from rain while keeping wiring concealed. Use a full-motion articulating mount (rated for outdoor use with stainless steel hardware) to adjust viewing angles for different seating zones. Mounts should attach to wall studs or masonry anchors rated for at least 80 lbs, even if the TV weighs less. Wind load and vibration from storms add stress beyond the TV’s static weight.
For patios without walls, freestanding TV stands or posts work. Sink a 4×4 or 6×6 pressure-treated post at least 36 inches into the ground, set in 80-lb bags of concrete. Let the concrete cure for 48–72 hours before mounting the TV. Run conduit underground from the house to the post, burying it at least 18 inches deep (per NEC 300.5) to protect wiring. Use Schedule 40 PVC or rigid metal conduit (RMC) rated for direct burial.
Another option: mount the TV on a pergola beam or gazebo rafter. Ensure the structure can support the weight, check with a structural engineer if unsure. Attach the mount to a 2×6 or larger beam, using lag bolts that penetrate at least 3 inches into solid wood. Avoid mounting to decorative lattice or thin trim that won’t hold under load.
For a polished outdoor theater experience, many homeowners replicate small backyard ideas for entertaining by integrating the TV into a multi-zone layout. Position the screen opposite primary seating, ideally with a 15–30-degree downward tilt to reduce glare and improve neck ergonomics for seated viewers.
Built-In Cabinet and Enclosure Solutions
Built-in TV cabinets blend the screen into patio architecture, protecting it from weather while maintaining a custom look. DIYers with carpentry skills can frame a cabinet using pressure-treated 2x4s and marine-grade plywood (¾-inch thickness), then clad the exterior in cedar, Trex, or fiber cement siding to match existing structures. Include a hinged or sliding door to cover the TV when not in use, adding a layer of protection and deterring theft.
Inside the cabinet, mount the TV to a ¾-inch plywood backer board secured to the cabinet frame. Install ventilation louvers (top and bottom) to prevent heat buildup, and consider a small 12V DC fan wired to a thermostat that activates above 85°F. Line the interior with weatherproof foam insulation to dampen sound and regulate temperature.
For those less comfortable with custom builds, prefabricated outdoor TV cabinets are available from manufacturers like The TV Shield and Storm Shell. These range from $800–$3,000 depending on size and features, and most include powder-coated aluminum frames, polycarbonate doors, and integrated cable management. Installation typically requires mounting the cabinet to a wall or post, then sliding the TV into pre-drilled brackets inside.
When considering placement strategies, resources on setting up an outdoor theater emphasize balancing screen visibility with ambient light control. Use retractable shades or strategically placed plantings to block direct sun during peak viewing hours without obstructing airflow.
Enhancing Your Patio TV Setup With Seating and Sound
A TV without comfortable seating and decent audio isn’t worth the effort. Arrange seating in an arc or L-shape facing the screen, with the closest seats 6–8 feet away to avoid neck strain. Weather-resistant sectionals with Sunbrella fabric or HDPE wicker frames hold up to sun and rain better than untreated wood or cushions. For large groups, add stackable resin Adirondack chairs or a mix of built-in bench seating along the patio perimeter.
Outdoor sound systems make or break the experience. TV speakers alone won’t cut it outdoors, ambient noise and lack of room acoustics kill clarity and volume. Install a pair of weatherproof outdoor speakers (rated IP65 or higher) on either side of the TV, angled toward the seating area. Brands like Polk, Klipsch, and Yamaha offer models in the $150–$400/pair range. For larger patios, add a passive or active soundbar designed for outdoor use, mounted below or above the TV.
Wire speakers using direct-burial speaker cable (12-gauge or 14-gauge, CL3-rated) if running underground. Surface-mounted cable should go through weatherproof conduit to prevent UV degradation and accidental damage. Connect everything to a weatherproof amplifier or AV receiver housed in a ventilated enclosure or utility closet near the patio. Many modern outdoor speakers support Bluetooth or Wi-Fi streaming, eliminating the need for long cable runs and simplifying installation.
Lighting plays a supporting role. Avoid mounting bright overhead lights directly behind the TV, this creates glare and washes out the image. Instead, use low-voltage LED path lights, string lights, or recessed deck lighting to illuminate walkways and seating without competing with the screen. Dimmer switches let users dial down ambient light during movies and ramp it up for post-game mingling.
For comprehensive patio upgrades, DIYers often tie TV installations into broader backyard design ideas for entertaining, coordinating screens, sound, and seating into a cohesive layout. Additional inspiration comes from patio entertainment setups that layer furniture, lighting, and tech into multi-functional zones.
Conclusion
Installing a patio TV transforms outdoor spaces into year-round entertainment hubs, but success hinges on choosing weather-resistant gear, smart placement, and proper electrical work. Start with a TV rated for outdoor use, or a quality enclosure, then tackle mounting, wiring, and seating as separate phases. Don’t skip permits for electrical runs, and factor in sound and lighting from the start. Done right, the patio becomes the go-to spot for game days, movie nights, and backyard parties that don’t migrate indoors when the sun sets.