A fireplace already anchors a room, but when it sits on a plain drywall expanse, it misses its full potential. An accent wall behind or around the firebox turns that focal point into a showpiece, adding texture, color, and architectural interest that pulls the whole space together. Whether working with a traditional masonry fireplace, a zero-clearance gas unit, or an electric insert, the wall treatment sets the tone for the room. From stacked stone and reclaimed wood to bold paint and large-format tile, the options span every style and skill level. This guide covers 21 practical accent wall ideas with fireplace installations, including material choices, installation considerations, and planning tips to help homeowners and DIYers execute a professional-looking transformation.
Table of Contents
ToggleKey Takeaways
- Fireplace accent wall ideas can transform your focal point by adding texture, color, and architectural interest through materials like stone, wood, tile, or paint.
- Material selection directly impacts design—stone and brick add warmth for traditional spaces, wood paneling provides organic texture, while tile offers modern aesthetics.
- Fireplace clearance codes (NFPA 211 standards) require combustible materials like wood to maintain at least 6 inches from the firebox opening, varying by local jurisdiction.
- Large-format tile and marble deliver a sleek, contemporary look with minimal grout lines, while shiplap and reclaimed wood create casual, textured finishes ideal for coastal or farmhouse styles.
- Paint is the fastest and most budget-friendly accent wall option, requiring proper surface prep and typically costing less than one gallon for a standard 10×10-foot wall.
- Planning your project requires accurate measurements, waste estimation, local code verification, and proper safety equipment—shiplap projects can finish in a weekend while tile installations need multiple days for curing.
Why a Fireplace Accent Wall Makes a Bold Design Statement
A fireplace accent wall solves several design challenges at once. It defines the room’s visual hierarchy, anchoring seating arrangements and creating a natural gathering point. It also conceals less-than-ideal proportions, a narrow chimney chase or an off-center firebox, by drawing the eye to the finished surface instead of the structure behind it.
Material choices directly impact the room’s character. Stone or brick adds mass and warmth, ideal for rustic or traditional interiors. Wood paneling brings organic texture without the weight of masonry. Tile or marble leans modern and clean-lined, especially in open-concept homes. Bold paint or textured plaster offers the quickest, most budget-friendly transformation, requiring minimal structural work.
From a practical standpoint, fireplace accent walls also provide an opportunity to address clearance codes and heat shielding. Any combustible material, wood, certain paints, or wallpaper, must meet National Fire Protection Association (NFPA) 211 clearances from the firebox opening and flue. Non-combustible materials like stone, tile, and brick offer more flexibility and are often required within a specified radius of the fire. Always verify local building codes and manufacturer specifications before selecting materials.
Stone and Brick Fireplace Accent Walls
Stacked Stone Veneer
Stacked stone veneer delivers the look of full-depth masonry at a fraction of the weight and cost. These thin-cut stone pieces, typically 1 to 2 inches thick, install directly over drywall or cement board with mortar or adhesive. Manufactured stone veneer (cast concrete with color pigments) mimics natural stone and costs less, while natural stone veneer offers authentic texture and variation.
Installation requires a level substrate and proper support. For walls exceeding 50 pounds per square foot, check framing to ensure studs (typically 16 inches on center) can handle the load, or add blocking. Apply a weather-resistant barrier (WRB) and metal lath if installing over wood framing, then spread mortar and press stones in place, working bottom to top. Grout joints for a finished look, or leave them dry-stacked for modern aesthetics. Plan for $10 to $30 per square foot for materials, depending on stone type.
Exposed Brick
If the home already has a brick chimney, exposing it creates instant character. Remove drywall carefully to avoid damaging the brick face, then clean mortar joints with a wire brush and masonry cleaner. Seal the brick with a breathable masonry sealer to prevent dust and efflorescence while allowing moisture to escape.
For faux brick, thin brick veneer or brick-look tile installs like stone veneer. Real thin brick, sliced from full bricks, offers authentic texture, while ceramic or porcelain brick tile provides uniform dimensions and easier cuts. Both work well within combustible clearance zones and pair naturally with fireplace design styles ranging from industrial lofts to farmhouse interiors.
Modern Shiplap and Wood Panel Accent Walls
Shiplap
Shiplap, horizontal boards with a rabbet joint that overlaps slightly, creates clean lines and a casual, coastal vibe. Use 1×6 or 1×8 pine boards (actual dimensions 3/4 × 5-1/2 inches or 3/4 × 7-1/4 inches) in nominal sizing. Install directly to wall studs with a brad nailer and 18-gauge nails, spacing boards with a nickel or 1/8-inch spacer for consistent reveals.
Before installation, check fireplace clearance requirements. Combustible materials like wood must maintain at least 6 inches of clearance from the firebox opening, though codes vary, some jurisdictions require 12 inches or more for unprotected wood. If clearances are tight, stop the shiplap short of the firebox and frame the opening with tile or stone.
Prime and paint shiplap before or after installation. Two coats of semi-gloss or satin interior paint provide durability and easy cleaning. For a natural wood look, apply polyurethane or Danish oil, but confirm it’s rated for the heat exposure your fireplace generates.
Reclaimed Wood and Board-and-Batten
Reclaimed barn wood or weathered planks add one-of-a-kind texture. Source from architectural salvage yards or specialty suppliers, and inspect for nails, rot, or insect damage. Plane and sand boards as needed, then secure with construction adhesive and finish nails.
Board-and-batten, wide vertical boards (typically 1×8 or 1×10) separated by narrow battens (1×2 or 1×3), works well on tall chimney chases. Install boards first, then cover seams with battens. Paint in a contrasting color or monochrome for a modern twist. Keep wood treatments away from direct heat and always wear safety glasses and a dust mask when cutting or sanding.
Tile and Marble Fireplace Wall Transformations
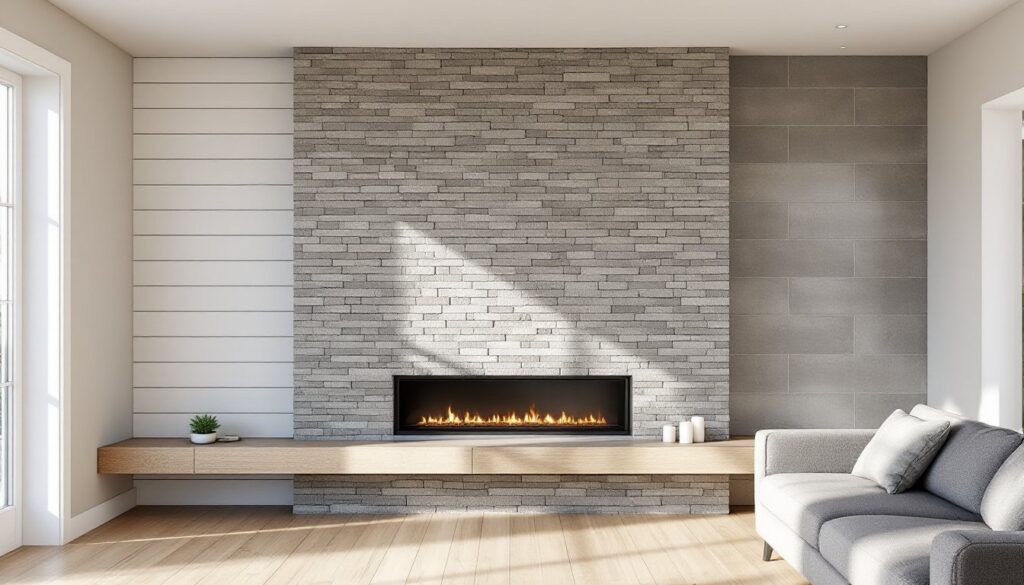
Large-Format Porcelain Tile
Large-format tiles, 12×24 inches or bigger, including 24×48-inch slabs, minimize grout lines and deliver a sleek, contemporary look. Porcelain tile rated for wall use handles heat well and comes in finishes mimicking concrete, marble, or wood. Install over 1/2-inch cement board for a stable substrate, using large-tile mortar with a 1/2 × 1/2-inch square-notch trowel.
Level the substrate carefully: any deviation telegraphs through large tiles. Use a tile leveling system (clips and wedges) to prevent lippage between tiles. Cut tiles with a wet saw for clean edges, and always wear hearing protection and eye protection when operating power tools.
Grout with unsanded grout for joints narrower than 1/8 inch or sanded grout for wider joints. Seal grout lines after curing to resist soot and dust. Expect materials to run $6 to $20 per square foot, not including labor.
Marble and Natural Stone Tile
Marble tile, classic Carrara, Calacatta, or honed black marble, brings luxury and permanence. 12×12-inch or 12×24-inch marble tiles are common, though you can also use marble mosaics for intricate patterns. Marble is softer than porcelain, so handle carefully during installation to avoid chips.
Seal marble with a penetrating stone sealer before grouting to prevent staining. Natural stone requires more maintenance than porcelain, but the veining and depth of color are unmatched. Interior designers on platforms like Homify often showcase marble accent walls paired with minimalist mantels and floating hearths for a high-end, gallery-like effect.
Bold Paint Colors and Textured Finishes
Dark Accent Colors
Paint is the fastest, most economical accent wall option. Deep charcoal, navy, forest green, or black creates dramatic contrast, especially when the firebox and mantel are white or light wood. Use interior latex paint in a matte or eggshell finish to minimize glare and hide minor wall imperfections.
Prep is critical. Fill nail holes and seams with joint compound, sand smooth with 120-grit sandpaper, and prime with a stain-blocking primer if covering a bold existing color. Two coats of finish paint usually suffice. One gallon covers roughly 350 to 400 square feet, so a typical 10×10-foot accent wall needs less than a gallon.
For fireplace surrounds, keep paint at least 6 inches from the firebox opening to avoid discoloration from heat. High-temperature paint (rated to 1200°F) is available for areas closer to the fire, but it’s typically reserved for metal fireplace components, not drywall.
Textured Plaster and Venetian Finishes
Textured plaster, such as skip trowel, knockdown, or Venetian plaster, adds dimensional interest without the weight of stone or tile. Apply over primed drywall with a trowel or plaster knife, building up layers and creating peaks or swirls. Knockdown texture involves spraying or hand-applying joint compound, then lightly flattening the peaks with a trowel once partially dried.
Venetian plaster, a lime-based finish with a polished, marble-like sheen, requires more skill but delivers a refined, Old World aesthetic. It’s applied in thin coats, burnished between layers, and sealed with wax or acrylic sealer. Many home improvement resources offer step-by-step tutorials for DIYers willing to practice the technique on sample boards first.
Planning Your Fireplace Accent Wall Project
Measuring and Material Estimating
Start by measuring the wall’s height and width, then calculate square footage. For stone, brick, or tile, add 10 percent waste to account for cuts and breakage. For shiplap or board-and-batten, measure each board’s coverage and round up to the nearest whole board.
Determine whether the accent wall spans the full width of the chimney chase or extends to adjacent walls. Floor-to-ceiling treatments make low ceilings feel taller, while stopping at picture-rail height can suit traditional proportions.
Clearances, Codes, and Safety
Verify clearance requirements in the International Residential Code (IRC) and your local amendments. Gas and electric fireplaces often allow closer material placement than wood-burning units. If uncertain, consult the fireplace manufacturer’s installation manual or a certified chimney sweep.
For structural changes, removing a non-load-bearing wall section or adding heavy stone, check if a building permit is required. Inspectors ensure proper backing, flashing, and fire-rated materials are used.
Always wear appropriate personal protective equipment (PPE): safety glasses, dust mask or respirator when cutting or sanding, gloves for handling sharp tile or stone, and hearing protection for power saws.
Tools and Installation Timeline
Common tools include a level, tape measure, stud finder, circular saw or miter saw, drill/driver, trowel (for tile or stone), and a wet saw (for tile cuts). Shiplap projects can often be completed in a weekend, while stone or tile installations may take several days, including mortar and grout cure times.
Having a second pair of hands helps, especially when lifting large tiles or aligning shiplap boards. If the project involves electrical outlets, light fixtures, or gas lines, hire a licensed electrician or plumber to relocate or extend those services safely.
Conclusion
An accent wall transforms a fireplace from functional fixture to room-defining feature. Whether using stone veneer, shiplap, large-format tile, or a bold paint color, the key is matching materials to the home’s style, respecting clearance codes, and investing in proper prep work. With careful planning and attention to detail, homeowners can achieve professional results that elevate their living space for years to come.