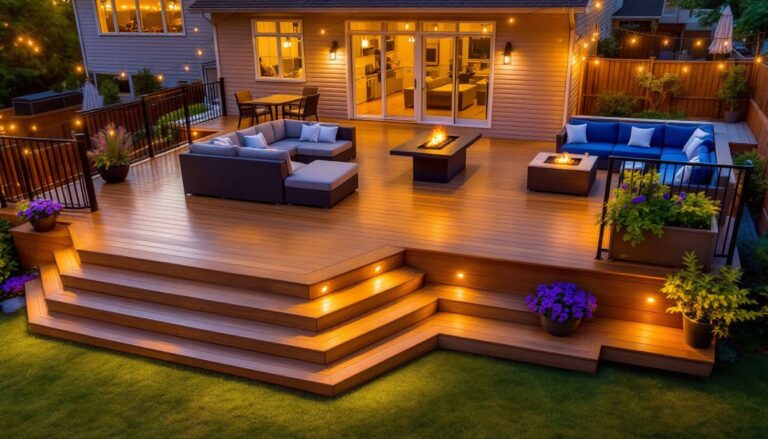

A patio without adequate coverage is half-functional at best. Whether it’s summer sun beating down at noon or a surprise rain shower cutting dinner short, the right roof extension turns an outdoor space from occasionally usable to year-round essential. Extending a patio roof isn’t just about adding square footage, it’s about reclaiming outdoor living space that works with weather instead of against it. From budget-conscious DIY builds to permanent structural additions, the options range widely in complexity, cost, and aesthetics. The key is matching the right design to the home’s architecture, local climate, and how the space will actually be used.
Table of Contents
ToggleKey Takeaways
- Extending a patio roof converts outdoor space from seasonal to year-round functional while reducing ambient temperature by 10–15°F and protecting against UV exposure and rain damage.
- Pergola extensions offer a balanced aesthetic with partial shade through slatted designs, while polycarbonate panels provide full weather protection and light transmission for maximum usability.
- Permanent gable or hip roof extensions integrate seamlessly with existing rooflines and return 50–70% of costs at resale, but require proper flashing, permits, and professional framing to prevent water infiltration.
- Retractable awnings and shade sails deliver flexible, budget-friendly coverage options, with motorized awnings costing $800–$3,000 while shade sails start under $500 and block 85–95% of UV rays.
- DIY patio roof extension options like corrugated metal roofing, canvas tarps, or lattice panels can be installed for under $1,000 in materials, but always verify local building codes before starting any project.
- Proper ledger board installation with correct flashing, structural fastening every 16 inches, and appropriate material selection—such as pressure-treated pine, cedar, or composite—are critical to preventing rot and water damage.
Why Extend Your Patio Roof?
Most patios get built with a single roof section that covers the immediate area off the back door. But as outdoor furniture accumulates and entertaining habits evolve, that original footprint often falls short. Extending the roof expands usable space without the cost and complexity of building an entirely new structure.
Protection from UV exposure is another practical driver. Unshaded patios turn into solar ovens by mid-afternoon, making furniture too hot to sit on and limiting the hours anyone wants to be outside. A roof extension cuts direct sun exposure and drops ambient temperature by 10–15°F in many cases.
Rain protection matters even more in regions with frequent afternoon showers. An extension can shelter a grilling station, outdoor kitchen, or seating area that otherwise sits unused half the year. It also reduces water infiltration along the house foundation and protects door thresholds from standing water.
From a resale perspective, covered outdoor space adds functional square footage that buyers notice. It’s not quite the same ROI as interior renovations, but well-executed patio roof work, especially permanent structures tied into the home, can return 50–70% of material and labor costs at sale time.
Pergola Extensions for a Classic Look
Pergolas strike a balance between full coverage and open-air aesthetics. A pergola extension typically consists of 4×4 or 6×6 posts spaced 8–12 feet apart, supporting 2×6 or 2×8 cross beams and 2×2 or 2×4 rafters laid perpendicular. The slatted roof provides partial shade and works well in climates where full sun protection isn’t critical.
Attaching a pergola to an existing patio roof requires a ledger board fastened to the house’s rim joist or blocking. Use ½-inch lag screws or structural screws every 16 inches into solid framing, never just into siding or sheathing. Flash the ledger properly with self-adhesive flashing tape to prevent water intrusion behind the connection point.
Material choice affects longevity. Pressure-treated pine is economical but requires annual sealing in wet climates. Cedar and redwood resist rot naturally and age to a silver-gray patina without finish, though they cost 40–60% more upfront. Composite or vinyl pergola kits eliminate maintenance but lack the structural heft for spans over 10 feet without additional bracing.
For more weather protection, add a polycarbonate panel roof between the rafters or drape outdoor fabric across the top. This converts a pergola into a hybrid structure that blocks rain while maintaining the open, airy look. Just ensure rafter spacing supports the panel width, most polycarbonate sheets come in 4-foot widths and shouldn’t span more than 24 inches unsupported.
Polycarbonate and Clear Roofing for Maximum Light
Polycarbonate panels deliver full weather protection without the cave-like dimness of solid roofing. Multiwall polycarbonate, the type with internal ribbing, offers better insulation and UV blocking than single-layer acrylic or corrugated fiberglass. Panels are typically available in 4-, 6-, 8-, and 10-foot widths, with lengths up to 24 feet.
Installation requires a supporting framework of 2×4 or 2×6 purlins running perpendicular to the house, spaced 24 inches on center for 6mm or 8mm multiwall panels. Thinner 4mm panels need 16-inch spacing to avoid sagging under snow load. Use polycarbonate-specific screws with neoprene washers, standard roofing screws will crack the material as it expands and contracts with temperature swings.
Pitch matters. A minimum 3:12 slope is necessary for water runoff: anything flatter and standing water will stain the panels and encourage algae growth. Corrugated polycarbonate handles lower slopes better than flat multiwall but transmits more heat.
Clear panels let in the most light but also the most heat. Bronze or gray-tinted polycarbonate blocks 40–50% of visible light and significantly more infrared, keeping the space cooler without going dark. For reference, projects involving outdoor material selection often recommend tinted options in southern climates where summer heat is a primary concern.
One often-overlooked detail: seal panel ends with aluminum U-channel or tape. Open ends allow moisture, dirt, and insects to infiltrate the hollow channels, creating unsightly streaks that are nearly impossible to clean out.
Retractable Awnings and Shade Sails
Retractable awnings offer flexibility that permanent structures can’t match. Extend them for shade during peak sun hours, retract them for stargazing or to avoid wind damage. Most residential models mount to a fascia board or ledger with heavy-duty brackets and extend 10–14 feet from the house.
Motorized awnings cost $800–$3,000 installed, depending on width and fabric grade. Manual crank versions run $400–$1,500 but require effort to deploy and retract, meaning they often stay in one position longer than ideal. Wind sensors are worth the $150–$200 upgrade, they automatically retract the awning when gusts exceed 20–25 mph, preventing frame damage.
Acrylic-coated polyester fabric holds up better than vinyl in UV exposure and doesn’t crack in cold weather. Expect 5–8 years of life in full sun before fading becomes noticeable. Cheaper vinyl fabrics might last 3–5 years before brittleness sets in.
Shade sails are the budget-friendly alternative. These tensioned fabric panels attach to posts or existing structures at three or four corner points, creating a sculptural canopy. HDPE (high-density polyethylene) fabric with UV stabilization is standard: it blocks 85–95% of UV rays and allows rain to pass through on permeable models.
Installation requires solid anchor points capable of handling 200–300 pounds of tension per corner. That means 4×4 posts set in concrete at least 24 inches deep, or heavy-duty eye bolts lagged into house framing, never just siding. Use turnbuckles at each corner to tension the sail taut, a sagging sail collects water and looks sloppy.
Gable and Hip Roof Extensions for Seamless Integration
For a permanent addition that looks factory-built, gable or hip roof extensions match the home’s existing roofline and integrate structurally. This isn’t a weekend DIY project, it involves cutting into the existing roof, tying into wall framing, and often pulling permits for structural work.
A gable extension continues the home’s roof slope out over the patio, maintaining the same pitch and ridge line. It requires removing a section of the existing roof’s fascia and soffit, then sistering new rafters or trusses onto the existing structure. Rafters typically run 2×6, 2×8, or 2×10 depending on span and snow load. Local building codes dictate spacing, usually 16 or 24 inches on center.
A hip roof extension ties in at an angle, creating a more complex framing job with valley rafters and jack rafters. The visual result is cleaner in many cases, especially on homes with hip roofs already. Hip construction requires more labor and material, figure 20–30% more than a gable of the same size.
Both styles require proper flashing where the new roof meets existing siding. Step flashing tucked behind siding and over shingles prevents water from running down the wall and into the roof deck. This is where most DIYers get in trouble, improper flashing leads to rot and leaks that don’t show up for months or years.
Expect to hire a structural engineer or architect if the extension exceeds 150 square feet or requires posts to land anywhere other than directly over existing foundation or footings. Cost guides and contractor resources suggest budgeting $50–$100 per square foot for professional gable or hip roof extensions, including materials, labor, and permits.
Budget-Friendly DIY Extension Options
Not every patio roof extension requires a permit, engineering, or a four-figure budget. Several approaches deliver functional coverage for under $1,000 in materials if the homeowner supplies the labor.
Corrugated metal roofing over a simple post-and-beam frame is one of the most cost-effective options. Galvalume or painted steel panels run $1.50–$3 per square foot and install quickly with exposed fasteners. Frame the structure with 4×4 treated posts and 2×6 beams, spacing posts no more than 8 feet apart. Metal roofing needs a minimum 1:12 pitch to shed water, though 3:12 or steeper looks better and drains faster.
Another budget route: canvas or heavy-duty tarp stretched over a wooden frame. Use 12-ounce canvas or reinforced polyethylene tarps with grommets every 18 inches. Lace the tarp to the frame with paracord or bungee cords, keeping tension even to avoid pooling. This setup works for seasonal coverage, take it down before winter snow load or high winds arrive.
Lattice panel roofing provides partial shade and installs in an afternoon. Fasten 4×8 privacy lattice panels (the type with tight spacing, not garden lattice) across 2×4 purlins. The open weave lets some light and rain through but cuts direct sun by 50–70%. Paint or stain the lattice before installation, it’s far easier on sawhorses than overhead.
All DIY patio roof extension ideas should begin with checking local building codes. Many jurisdictions allow detached structures under 120–200 square feet without a permit, but rules vary. Anything attached to the house or exceeding height limits almost always requires review.
Conclusion
Extending a patio roof isn’t about picking the most expensive option, it’s about matching the design to the home’s structure, climate demands, and realistic budget. Whether that’s a full gable roof addition tied into the existing house or a shade sail tensioned between posts, the result should expand usable outdoor space and hold up to the weather patterns the region throws at it. Measure twice, flash everything properly, and don’t skip the permit process when local codes require it.