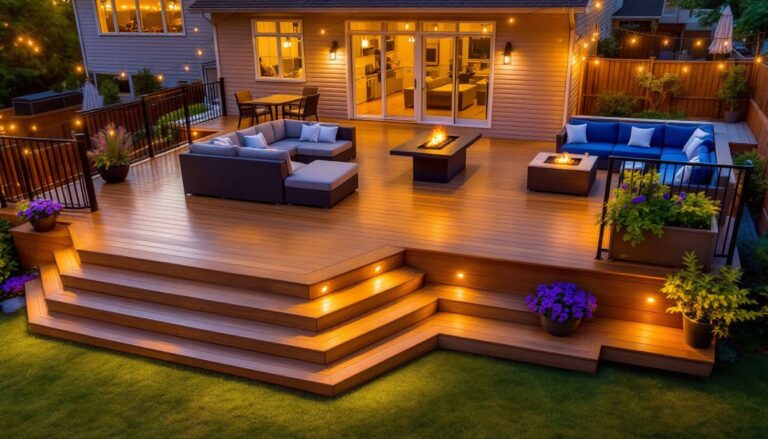

A well-designed fire pit turns any backyard into a gathering spot worth using year-round. Whether someone’s aiming for rustic charm or a sleek modern aesthetic, the right design balances function, safety, and visual appeal. This guide walks through practical fire pit styles, material choices, placement strategies, and finishing touches that make outdoor spaces both inviting and safe. From budget-friendly DIY builds to landscaped focal points, these ideas help homeowners create a fire feature that fits their space, skill level, and entertaining goals.
Table of Contents
ToggleKey Takeaways
- A well-designed backyard fire pit balances function, safety, and aesthetics, with the choice between built-in permanent designs and portable units depending on long-term commitment and budget.
- Durable fire pit materials include steel rings, firebrick-lined concrete blocks, and poured concrete, while soft brick, cinder block without firebrick, and thin sheet metal should be avoided to prevent premature failure.
- Proper placement requires minimum 10-foot clearances from structures and combustible materials, a non-combustible base like compacted gravel or concrete, and compliance with local fire codes and permit requirements.
- Comfortable seating positioned 4–6 feet from the fire pit edge, combined with integrated landscaping and strategic lighting, transforms a functional fire feature into an inviting gathering destination.
- Budget-friendly DIY fire pit projects using steel rings or stacked concrete blocks can be completed in 4–6 hours for $170–$280, making backyard fire pit design accessible without professional contractors.
Choosing the Right Fire Pit Style for Your Backyard
Fire pit style dictates everything from installation complexity to how the space gets used. The first decision: permanent or portable.
Built-in fire pits offer a polished, integrated look. They’re typically constructed from brick, stone, or concrete block and require excavation, a gravel base, and often a gas line or dedicated wood storage. These work best for homeowners committed to a specific layout and willing to invest in a professional-grade build. Built-ins can incorporate seating walls, raised hearths, or even cooking grates. Expect to pull permits in most jurisdictions, fire features often fall under local fire codes and setback requirements from structures and property lines.
Portable fire pits provide flexibility. Steel, cast iron, or copper models can be moved for lawn care, stored in winter, or relocated as landscaping evolves. They range from basic fire bowls under $100 to high-end propane tables topping $1,500. Portable units don’t require permits in most areas, but local fire regulations still apply, open flames may be restricted during burn bans or in densely built neighborhoods.
Built-In vs. Portable Fire Pits
Built-in advantages:
- Permanent focal point that anchors outdoor living zones
- Can integrate utilities (gas lines, drainage, lighting)
- Higher material durability and heat retention
- Adds property value when well-executed
Portable advantages:
- No permits, no excavation, no curing time
- Easier to repair or replace
- Adaptable to changing layouts or renters
- Lower upfront cost
For homeowners planning long-term backyard entertaining spaces, built-in designs deliver more impact. Renters or those testing the waters should start portable.
Best Materials for Durability and Aesthetics
Material choice affects heat resistance, weathering, maintenance, and visual style. Here’s what holds up:
Steel fire rings are the workhorse option. A 3/16-inch or thicker steel ring provides structure for in-ground or above-ground builds and withstands high heat without cracking. Steel rusts over time, developing a warm patina, some homeowners embrace it, others paint with high-temp spray enamel rated to 1200°F. Cost runs $50–$150 for a 36-inch ring.
Concrete block and firebrick suit DIY builds. Standard 8×8×16-inch concrete blocks form the outer structure: line the interior with firebrick (rated to 2000°F+) to protect the blocks from direct flame. Firebrick costs about $2–4 per brick: a 36-inch diameter pit needs roughly 30–40 bricks for a single course. Concrete alone will spall and crack under repeated heat.
Natural stone (flagstone, limestone, granite) offers high-end aesthetics but requires mortar and a solid footing. Stone weighs significantly more than block, factor in a compacted gravel base at least 4 inches deep. Mortared stone needs expansion joints to handle thermal expansion. Hiring a mason costs $50–$100/hour, and material runs $15–$30 per square foot depending on region and stone type.
Poured concrete creates custom shapes and smooth modern lines. Reinforced with rebar or wire mesh, concrete fire pits can incorporate integral color, stamped texture, or acid staining. This is advanced work, mixing ratios, forms, and curing matter. Forms must account for interior firebrick lining or a steel insert.
Steel bowls and propane tables dominate the portable market. Look for 1/8-inch to 1/4-inch steel or cast iron for longevity. Powder-coated finishes resist rust better than paint. Propane models use a burner rated in BTUs, 30,000 to 60,000 BTU is typical for a 36–48 inch table. Always check that units comply with CSA or UL certification for outdoor use.
Avoid soft brick, cinder block without firebrick lining, or thin sheet metal under 14-gauge, they’ll fail within a season.
Fire Pit Placement and Safety Considerations
Where a fire pit goes matters as much as what it’s made of. Poor placement risks property damage, code violations, and injuries.
Clearances:
- Minimum 10 feet from structures, including the house, shed, fence, and overhanging tree branches. Some jurisdictions require 15–25 feet, check local fire marshal rules.
- At least 10 feet from combustible landscaping like mulch beds, wood piles, and dried ornamental grasses.
- Keep propane tanks (if using gas) at least 3 feet from the pit and never store them indoors.
Surface prep:
Fire pits need a non-combustible base. Grass, wood decks, and bare dirt aren’t sufficient. Use:
- Compacted gravel or crushed stone (4–6 inches deep) topped with pavers, flagstone, or firebrick
- Concrete patio or slab (existing or poured)
- Fire-rated mats (for portable units on decks, rated for the specific heat output)
Never place a fire pit on a wood deck without a manufacturer-rated pad. Even then, check local codes, many municipalities ban open flame on wood decking entirely.
Ventilation and wind:
Avoid enclosed spaces like covered patios without adequate ventilation. Carbon monoxide buildup is a real risk. Wind direction matters too, position seating so prevailing winds blow smoke away from guests, not into faces.
Utilities:
Call 811 before digging. Hitting an underground gas, electric, or water line is dangerous and expensive. For gas fire pits, hire a licensed plumber to run the line and a licensed electrician if adding ignition systems.
Permits:
Most permanent fire pits require a building permit. Gas lines always require a permit and inspection. Portable units typically don’t, but verify with the local building department.
Safety gear on hand:
- Fire extinguisher (ABC-rated, mounted within 10 feet)
- Garden hose or water source
- Spark screen or mesh lid for wood-burning pits
- Heat-resistant gloves and poker
Always extinguish fires completely before leaving or going to bed. Douse with water, stir ashes, and douse again.
Creating a Cozy Seating Area Around Your Fire Pit
A fire pit without comfortable seating is just a hole with flames. The goal: create a conversational zone that pulls people in.
Seating distance:
Place chairs 4 to 6 feet from the fire pit edge. Closer feels too hot: farther loses the warmth. For a 36-inch fire pit, a 12-foot diameter seating circle works well. Measure before buying furniture.
Seating options:
- Built-in stone or block benches: Match the fire pit material for a cohesive look. Cap with smooth flagstone or concrete caps for comfort. Add outdoor cushions for longer gatherings.
- Adirondack chairs or deep-seat loungers: Weather-resistant poly lumber or teak handle heat and moisture. Avoid cheap resin that warps.
- Movable metal or wood chairs: Easier to rearrange. Look for powder-coated aluminum or sealed hardwood. Keep an extra two chairs in the garage for overflow guests.
- Built-in seating walls: Construct a low wall (16–18 inches high, 16–20 inches deep) using the same material as the pit. Top with capstone and cushions.
Surface underfoot:
Gravel, pavers, or flagstone provide stable, all-weather footing. Avoid loose mulch or bare grass, muddy shoes and uneven ground make seating uncomfortable. A 10×10 foot paver patio surrounding the pit adds definition and keeps furniture level.
Shade and cover:
Consider a pergola or sail shade for daytime use, positioned to avoid smoke interference. Don’t fully enclose the area, smoke needs an exit.
Accessories:
- Side tables within arm’s reach (heat-resistant metal or stone)
- Outdoor storage bench for firewood, blankets, and fire tools
- String lights or post lights to extend evening use
For those focused on small backyard ideas for entertaining, built-in or L-shaped seating maximizes capacity without crowding the space.
Enhancing Your Fire Pit with Landscaping and Lighting
Landscaping and lighting turn a functional fire pit into a destination.
Landscaping strategies:
- Fire-resistant plantings: Keep flammable plants at least 10 feet away. Use succulents, ornamental grasses (kept trimmed and green), lavender, or groundcovers like creeping thyme within the outer zone.
- Hardscape borders: Define the fire pit area with retaining wall blocks, railroad ties (treated and non-combustible), or stacked stone. This creates visual separation and contains gravel or mulch.
- Privacy screens: Plant hedges, install fence sections, or use lattice panels to block sightlines from neighbors. Choose slow-burning species like boxwood or holly.
- Pathways: Install a defined path from the house or deck to the fire pit using pavers, gravel, or stepping stones. This reduces wear patterns in the lawn and provides safe footing after dark.
Many homeowners find that landscaping tips for incorporating fire pits help with zoning considerations and material selection.
Lighting options:
- Low-voltage LED path lights: Line walkways and seating perimeters. Use 3–5 watt fixtures spaced 6–8 feet apart. Kits run $100–$300 and install without an electrician.
- String lights or bistro lights: Hang from pergola beams, fence posts, or dedicated poles. Choose outdoor-rated LED bulbs (S14 or G40 size) on 14- or 16-gauge wire. Plug into a GFCI outlet.
- Uplighting: Position spotlight fixtures at the base of trees or architectural features to create depth and drama. Use warm white (2700K–3000K) to match fire glow.
- Solar accents: Stake solar LED lights around planting beds or along pathways for maintenance-free ambiance. Performance varies, budget models dim after a few hours.
Fire pit accents:
Fire glass, lava rock, or ceramic logs dress up gas fire pits. These materials are rated for high heat and come in various colors. Avoid river rock in wood-burning pits, moisture trapped inside can cause them to explode.
Integrate seating, plantings, and lighting into a cohesive plan. Resources like those found on Southern Living often showcase regional outdoor living ideas that balance aesthetics and climate.
Budget-Friendly DIY Fire Pit Projects
A fire pit doesn’t require a contractor or a four-figure budget. These DIY builds deliver function and style on a modest spend.
Basic in-ground fire pit:
Materials:
- Steel fire ring (36-inch): $50–$100
- Pea gravel or crushed stone (1 ton): $30–$50
- Firebrick (40 bricks): $80–$120
- Landscape fabric: $10
Steps:
- Mark a 48-inch diameter circle. Excavate 12 inches deep.
- Line the bottom with landscape fabric. Add 4 inches of gravel: tamp firm.
- Center the steel ring. Backfill around it with gravel.
- Line the interior with firebrick stood on edge. No mortar needed, dry-stacked firebrick handles expansion.
- Surround the perimeter with pavers or stone for a finished edge.
Total cost: $170–$280. Time: 4–6 hours.
Concrete block fire pit:
Materials:
- Concrete blocks (8×8×16, 40 blocks): $1.50 each = $60
- Firebrick (30 bricks): $70
- Construction adhesive (high-temp): $15
- Capstones (optional): $40
Steps:
- Level a 48×48-inch area. Lay a 4-inch gravel base: compact.
- Dry-stack two courses of blocks in a square or circle (use a string compass for circles).
- Line the interior with firebrick, adhered with high-temp adhesive.
- Add capstones or smooth pavers on top for a finished look.
Total cost: $185. Time: 3–4 hours.
Pros and cons:
DIY saves labor costs but requires accurate measuring, level surfaces, and patience. Mistakes in a permanent build are expensive to fix. If the project involves gas lines, electrical, or structural questions, hire a pro. Budget-conscious backyard designs often blend DIY elements with selective professional help for the best value.
Safety:
Always wear safety glasses and work gloves when cutting block or stone. Use a dust mask when working with dry concrete mix or cutting pavers with a grinder. Keep a first-aid kit and phone nearby.
Tool list:
- Shovel and garden rake
- Hand tamper or plate compactor (rent for $40/day)
- Level (4-foot)
- Tape measure and string
- Circular saw with masonry blade (optional for cutting blocks)
- Work gloves, safety glasses, dust mask
For more backyard entertaining ideas, combining a DIY fire pit with simple seating and lighting creates a high-impact gathering spot without the high price tag.
Finishing touches:
Apply a concrete sealer to block or poured concrete fire pits to resist moisture and staining. Reseal every 2–3 years. For steel rings, a coat of high-temp paint slows rust.
Maintenance is minimal: remove ash after each use, check for cracks annually, and re-level stones or pavers as the ground settles. A well-built fire pit lasts 10–20 years with basic care.
Homeowners ready to expand their setup can explore ideas on Sunset for regional design inspiration and material recommendations suited to climate and terrain.