
Building or upgrading a deck isn’t just about adding square footage, it’s about creating a functional outdoor room that extends living space and boosts property value. Whether planning a simple platform deck or a complex multi-level structure, homeowners face dozens of design decisions that affect both aesthetics and long-term durability. The right deck design balances material costs, maintenance requirements, and structural codes while delivering a space that’s actually usable for entertaining, dining, or relaxing. This guide walks through proven deck design strategies, material comparisons, and built-in features that make the difference between a basic wooden platform and an outdoor space worth showing off.
Table of Contents
ToggleKey Takeaways
- Backyard deck design requires balancing functionality, material choice, and proper structural codes—a 12×12 foot dining deck is the minimum size for comfortable entertaining.
- Composite decking offers 25-30 year durability and requires only soap and water maintenance, while natural wood like pressure-treated pine is more budget-friendly but demands regular staining every 2-3 years.
- Multi-level deck designs solve sloped yard challenges and create distinct activity zones, but require independent framing, frost footings below the frost line, and often engineered plans for permitting.
- Built-in features like benches, planter boxes, and integrated coolers must be planned during initial framing to ensure proper structural support before decking installation.
- Deck lighting should include code-required stair and landing illumination, with low-voltage LED options offering the best balance of safety, ambiance, and ease of installation.
- All outdoor electrical circuits must be GFCI-protected, and proper ledger board installation with flashing to the rim joist is critical to prevent deck collapse.
Choose the Right Deck Size and Layout for Your Space
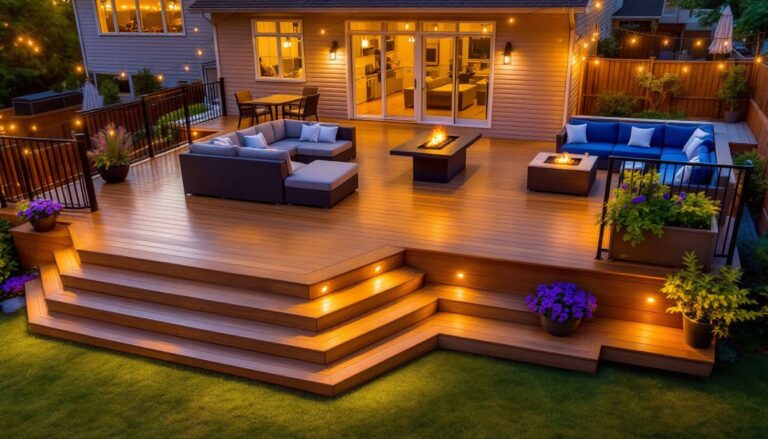
Deck size should be driven by intended use, not arbitrary dimensions. A dining deck needs at least 12×12 feet to comfortably fit a six-person table and chairs with clearance for walking. For furniture groupings with a grill and seating area, plan for 16×20 feet or larger. Anything smaller than 10×10 feet often feels cramped once furniture is in place.
Start by measuring the yard and noting door locations, existing landscaping, and sun exposure throughout the day. Decks attached to the house (the most common configuration) require a ledger board properly flashed and bolted to the rim joist or band board, not just siding. This connection point is critical, improper ledger installation is a leading cause of deck collapse.
Layout options include:
- Straight run: Simple rectangle extending from the house, easiest to permit and build
- L-shape: Wraps a corner, useful for creating separate zones (dining vs. lounging)
- Island deck: Freestanding structure away from the house, requires frost footings and often additional permitting
- Wraparound: Connects multiple doorways, common on older homes with irregular floor plans
Most jurisdictions require permits for decks over 30 inches above grade, and many require them regardless of height if the deck is attached to the dwelling. Check local building codes before finalizing dimensions. Setback requirements (typically 3-10 feet from property lines) can force layout adjustments on smaller lots.
Consider traffic flow from doors to stairs and from the deck to yard features like pools, sheds, or outdoor entertaining areas. Stairs should be at least 36 inches wide, with treads no less than 10 inches deep and risers no more than 7¾ inches high per IRC standards.
Popular Deck Materials: Pros and Cons
Material choice affects upfront cost, maintenance schedule, lifespan, and even building code compliance. The two dominant categories, composite and natural wood, each have distinct trade-offs.
Composite Decking for Low Maintenance
Composite decking combines wood fibers and plastic (polyethylene or PVC) into boards that resist rot, insects, and splintering. Brands like Trex, TimberTech, and Fiberon dominate the market. Composite costs $3-8 per square foot for materials (roughly double the cost of treated lumber), but eliminates annual staining or sealing.
Key advantages:
- No yearly maintenance: Soap and water cleaning is typically enough
- Consistent color: Factory finish doesn’t fade as dramatically as stain
- Splinter-free surface: Safer for bare feet
- 25-30 year warranties: Many manufacturers offer fade and stain coverage
Drawbacks to consider:
- Heat retention: Dark composite boards can become uncomfortably hot in direct sun (10-20°F hotter than wood)
- Limited repairability: Damaged boards can’t be sanded or refinished
- Thermal expansion: Composite expands and contracts more than wood: requires proper gapping per manufacturer specs (typically ⅛-¼ inch)
- Structural support still needs wood or steel: Composite is for decking only, not joists or beams
Composite works best on ground-level decks or small backyard spaces where heat buildup is less of an issue. For elevated decks in full sun, lighter colors are essential.
Natural Wood for Classic Appeal
Pressure-treated Southern yellow pine remains the most budget-friendly option at $1.50-3 per square foot. It’s rated for ground contact, resists rot and insects when properly maintained, and can last 15-25 years with regular staining every 2-3 years. Expect the wood to warp, check, and split over time, this is normal and mostly cosmetic.
Cedar and redwood offer natural rot resistance and a premium appearance. Cedar costs $3-5 per square foot, redwood slightly more. Both require annual sealing to maintain color: left untreated, they’ll weather to silvery gray. These species are softer than treated pine and more prone to denting from furniture or foot traffic, as noted by wood deck planning resources from Gardenista.
Tropical hardwoods (ipe, tigerwood, cumaru) are incredibly dense and durable, lasting 40+ years with minimal maintenance. Cost runs $6-12 per square foot, and the material is heavy enough to dull saw blades quickly. Hardwoods require pre-drilling for fasteners and specialized carbide-tipped bits.
Wood deck framing uses nominal 2×8, 2×10, or 2×12 joists (actual dimensions are ½ inch smaller) spaced 16 inches on center for most decking materials. Joist span tables in the IRC dictate maximum distances between beams based on species and load.
Multi-Level Deck Designs for Added Dimension
Multi-level decks solve problems on sloped lots, create distinct activity zones, and add visual interest. A two-tier design might place dining on the upper level (adjacent to the kitchen door) and seating or a hot tub on the lower level, with 4-6 step transition between.
Structural considerations get more complex:
- Each level requires independent framing with posts, beams, and joists designed for its specific height and load
- Landings between long stair runs must be at least 36 inches deep (IRC requirement)
- Railing continuity across levels needs careful planning to avoid awkward interruptions
- Frost footings for support posts must extend below the frost line (varies by region, typically 12-48 inches deep)
Multi-level decks almost always require permits and engineered plans in areas with seismic activity or high wind loads. Expect permitting costs of $200-1,000 depending on jurisdiction complexity.
Building separate platforms connected by stairs is often easier than notching joists for level changes mid-span. This modular approach also allows different decking materials or patterns on each level, say, diagonal boards on the dining level and straight runs on the lounge level.
On steep slopes, consider a cascading design with three or more smaller platforms stepping down the yard. This minimizes the need for tall support posts (anything over 8 feet gets expensive and requires additional bracing) and creates natural spots for landscaping transitions between levels.
Creative Deck Features and Built-In Elements
Built-ins transform a deck from a simple platform into a custom outdoor room. Plan these features during initial framing, not as afterthoughts, structural support needs to be in place before decking goes down.
Built-in benches eliminate the need for bulky furniture and define edges. Standard seat height is 17-18 inches, with a depth of 15-18 inches. Add a backrest at 12-15 inches high (measured from the seat) for comfort. Frame benches with 2×4 or 2×6 lumber, tie them into deck joists or blocking for stability, and cap with matching decking material. Under-bench storage is a bonus, just add hinged lids.
Planter boxes require drainage holes drilled in the bottom and a layer of landscape fabric to prevent soil from washing through. Line the interior with galvanized or plastic sheeting to protect wood framing from constant moisture. Size planters proportionally, a 24×24 inch box holds enough soil for small shrubs or perennials without overwhelming the deck.
Integrated coolers need insulation and drainage. A built-in ice chest framed between joists should have a plastic or stainless liner, a drain routed through the deck floor, and a hinged lid. Standard cooler dimensions are around 30×18 inches for a 60-quart capacity.
Privacy screens mounted to the deck perimeter provide wind breaks and sight line control. Options include:
- Lattice panels: Inexpensive but flimsy, best for light-duty applications
- Horizontal slat screens: Clean modern look, can be spaced for partial or full privacy
- Cable rail with fabric: Industrial aesthetic, fabric can be swapped out seasonally
Any screen over 6 feet tall may require permit approval as a fence structure. Check local ordinances.
Fire pits or fireplaces need non-combustible surfaces (stone or cement board) installed under and around them. Propane fire pits are safer on wood decks than wood-burning models. Always maintain manufacturer-specified clearances from railings and overhead structures. If considering pergola additions, coordinate fire feature placement for safe clearance.
Deck Lighting Ideas to Enhance Ambiance and Safety
Lighting is both a code requirement and a design opportunity. IRC requires illumination at stairs and landings, though specific lumen levels aren’t mandated for residential decks. Beyond meeting code, strategic lighting extends deck usability into evening hours and highlights architectural features.
Riser lights mount on vertical stair faces, illuminating each tread. LED strip lights are the easiest retrofit option, adhesive-backed, low-voltage strips run off a transformer plugged into a GFCI outlet. Individual step lights (recessed into risers or posts) offer a cleaner look but require routing wires during construction.
Post cap lights sit atop railing posts, providing ambient glow and marking the deck perimeter. Solar versions eliminate wiring but deliver inconsistent light output. For reliable brightness, run 12V low-voltage wire from a transformer through hollow vinyl posts or surface-mounted in conduit along wood posts.
Recessed deck lights (downlights) mount flush with the decking surface, similar to can lights indoors. They require 3½ inch depth under the deck for the housing, only feasible with elevated decks built on joists. Space them 6-8 feet apart for even coverage. Use fixtures rated for wet locations (UL rating) and trim rings that sit flush with boards to avoid tripping hazards.
String lights or bistro bulbs hung overhead add a casual, festive feel, popular in entertaining-focused designs. Mount cables to the house fascia and posts using eye hooks rated for the load, and use 14-gauge outdoor extension cords for power. String lights are decorative, not safety lighting, and shouldn’t be the sole illumination source.
Under-rail lighting runs along the underside of top rails or underneath bench seats, creating a floating effect. This indirect approach minimizes glare while defining edges. Flexible LED tape lights are ideal, they bend around corners and come in various color temperatures. Stick with 3000K warm white for a residential feel: cooler temperatures feel commercial.
All outdoor lighting circuits must be on GFCI-protected outlets per NEC Article 210.8. If running new circuits, that’s often a job for a licensed electrician unless the homeowner is comfortable with electrical work and local codes permit DIY electrical. Low-voltage systems (under 30V) don’t require permits in most areas, making them DIY-friendly.
Transformer sizing: Add up the wattage of all lights on the circuit and choose a transformer rated for at least 125% of that total. For example, ten 3-watt lights (30 watts total) need a minimum 37.5-watt transformer, a 40-watt or 50-watt unit would be appropriate.
Positioning lighting controls indoors (near the door to the deck) beats installing weather-resistant switches outdoors. Smart plugs or switches allow scheduling and remote control, useful for lighting that homeowners want on automatically at dusk.
Deck design success comes down to balancing ambition with building science. A well-planned deck respects load calculations, drainage, and material properties while delivering a space that actually gets used. Whether tackling a weekend build or planning a contractor-installed project, understanding these fundamentals ensures the finished deck performs as well as it looks.